
Can player movement functions (walking and turning basically) be disabled and/or forced? If so, that would open up a lot of possibilities for unique puzzles and combat challenges. I have a few examples of stuff I'd like to do if it actually is possible to manipulate player movement.
"Slippery Floor" Puzzle
Sort of like an "ice sliding puzzle", like this result on Google Images:
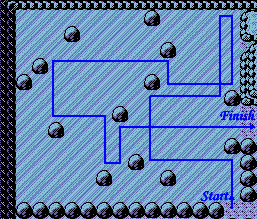
When the player steps out on the ice, or in my case, a cursed floor (don't really want custom ice tiles, and blaming things on curses works pretty well in the world of Grimrock
SpoilerShow

What each object is and does should be explained well enough in the Key List or in the list in the next spoiler box. The different colors of certain objects are just to tell the difference between them. They shouldn't actually have colored textures in-game. I've given numbers to each row of cursed floor tiles, and letters to each column, just to be able to refer to specific squares. I will refer to them as "x:y" and then a direction, so for example, the blue button is at "2:f east".
I really hope no one that sees this is colorblind, because that might make it difficult to see the difference between certain colored objects. If someone does happen to be colorblind and isn't sure which color a certain object is, you can just read the list in the next spoiler box. In this list I've tried to describe each object on the map. Each object is only defined once. I hope it's comprehensible
SpoilerShow
- 1:a west: Red button. Only closes 1 "bad" spear door, no "good" ones.
- 1:a south: Dark green spear door. This is the only one that is closed (solid wall) by default. The rest of the spear doors are open. Also, this is a "bad" spear door, meaning that if players reach this door, they have no choice but to reset the puzzle.
- 1:b north: Entry to goal!
- 1:c south: Solid wall.
- 1:c east: Green spear door. Bad one.
- 1:d north: Entry to a point of no return. The player can read a mean message about how bad they should feel about themselves if they reach such a place again. There is also a button to teleport out and reset the puzzle.
- 2:a east: Green spear door. The east side of this one is "good", meaning the player should stop there in order to reach the goal. West side is bad though.
- 2:d east: Yellow spear door. East side is good, west side is bad.
- 2:f east: Blue Button. Only closes 1 good spear door, no bad ones.
- 2:f south: Solid wall.
- 3:a west: Entry to secret that actually can't be reached before the puzzle has been solved and the curse has been "lifted".
- 3:b east: Solid wall.
- 3:b south: Red spear door. Not sure if bad, because it can't actually be reached. In any case, not good.
- 3:c west: Yellow Button. Closes 2 spear doors, both of which are good on one side and bad on the other side.
- 4:f south: Yellow spear door. South side is good, north side is sort of bad, because going west from 4:f places you at 4:a, and from there the only good direction is back to 4:f. Going north from 4:f is not bad.
- 5:a west: Green Button. Closes 3 spear doors. One is completely bad (1:c east). Another is good on east side, bad on west side (2:a east). Last one is good on west side, and it's east side cannot be reached when the door is closed (5:e east).
- 6:a south: Entry into the bad starting position. If you reach this square, and some others on the A column, you have failed and have to reset the puzzle.
- 6:b east: Blue spear door. East side is good, west side cannot be reached once it is closed.
- 6:d south: Entry to a point of no return. Same as the one north of 1:d basically. The whole D column is bad, really.
- 6:f south: Entry into the good starting position.
The squares not listed are simply empty or are either south or east of objects that already have been defined.
Man, every time I say "west side is bad, east side is good" I feel like I look like a Biggie Smalls fan/2Pac hater
I like them both equally, if that matters...
SpoilerShow
- Start on the right side. Go north to 3:f.
- Go west to 3:c and press the Yellow Button.
- Go south to 6:c.
- Go east to 6:f.
- Go north to 5:f. A Yellow spear door stops you.
- Go west to 5:a and press the Green Button.
- Go east to 5:e. A Green spear door stops you.
- Go north to 1:e.
- Go east to 1:f.
- Go south to 2:f and press the Blue Button.
- Go west to 2:e. A Yellow spear door stops you.
- Go south to 6:e.
- Go west to 6:c. A Blue spear door stops you.
- Go north to 2:c.
- Go west to 2:b. A Green spear door stops you.
- Go north past 1:b and into the goal! Puzzle Completed! Curse Lifted! You can now walk to the secret area.
"Turn Left" Puzzle
In this puzzle the center 7x7 area of a 9x9 room is "cursed". The curse makes the player do one of two things:
- If no obstacle is in front of the player, they can only move forward. So basically, assuming you use default controls, your Q, E, A, S and D will stop working until you leave the cursed area.
- If there is an obstacle in front of the player, turning left (Q, by default) becomes possible, until you no longer face an obstacle. Left could just as well have been right, but I had to decide on one.
The player has to figure out where to enter, which levers to switch, where to enter once certain levers have been switched. All whilst having restricted movement capabilities.
Here is a much simpler sketch than the slippery floor one:
SpoilerShow

A difference between the this one and the slippery puzzle is that there are way more squares from which you can enter the cursed area.
Another difference is that the doors (which again, should be spear doors or other doors that cause little clutter) are controlled by levers here, and there is no way of getting stuck*, meaning that there is no need for a reset trigger. If you activate a lever that you shouldn't have, it's always possible to get back to it and deactivate it.
Lastly, a barely significant difference is that all doors are open by default in this puzzle, unlike the slippery puzzle where there was that one dark green door that was closed by default.
*Technically, you end up in an endless loop if you ignore the Yellow Lever once you reach it. Not sure that i really have to mention that though
In this sketch, I was too lazy to name the squares, but it should be easy enough for anyone to imagine that the north-west corner of the cursed area (the 7x7 white squares) is 1:a and the south-west corner is 7:g. Like with the slippery puzzle, here is a list of objects in the map:
SpoilerShow
- 1:a west: Green door.
- 1:a north: Solid Wall.
- 1:b south: Solid Wall.
- 1:c east: Blue Door.
- 1:d north: Entry to goal!
- 1:g north: Solid Wall.
- 1:g east: Solid Wall.
- 1:g south: Red Door.
- 2:b east: Red Door.
- 2:c east: Solid Wall.
- 2:d east: Solid Wall.
- 2:d south: Solid Wall.
- 2:e south: Solid Wall.
- 3:a west: Solid Wall.
- 3:a east: Blue Door.
- 3:a south: Solid Wall.
- 3:b east: Yellow Door.
- 3:e north: Yellow Lever. The Yellow, Cyan and Green Levers will all have to be activated once and then deactivated once again before the player can reach the goal.
- 3:e east: Solid Wall.
- 3:f south: Solid Wall.
- 4:a west: Solid Wall.
- 4:a east: Solid Wall.
- 4:c east: Solid Wall.
- 4:d west: Cyan Lever.
- 4:d south: Red Door.
- 4:g east: Solid Wall.
- 5:a east: Solid Wall.
- 5:c south: Blue Door.
- 5:e east: Solid Wall and Blue Lever. The Blue lever will have to be activated and stay activated for the player to reach the goal.
- 5:e south: Solid Wall.
- 6:a west: Solid Wall.
- 6:a south: Solid Wall.
- 6:b south: Red Door.
- 6:f east: Solid Wall.
- 6:g south: Cyan Door.
- 7:a north: Red Lever. The Red Lever does no good at all and should be left untouched. The Red Doors just waste the player's time.
- 7:a east: Solid Wall.
- 7:b south: Solid Wall and Green Lever.
- 7:f east: Green Door.
- 7:f south: Cyan Door.
- 7:g east: Solid Wall.
- 7:g south: Cyan Door.
Same thing goes for the squares not listed in this one as the one not listed in the slippery floor one.
*By drawing squares with 5x5 pixel interiors, I made it kind of hard for myself to show that the Yellow Lever is used twice in the same image.
SpoilerShow

SpoilerShow
- Go to the square west of 5:a and walk east to 5:a. (Picture 1)
- Turn left and walk north to 4:a.
- Turn left twice and walk south to 6:a.
- Turn left and walk east to 6:f.
- Turn left and walk north to 4:f.
- Turn left and walk west to 4:d.
- Activate the Cyan Lever, turn left, walk south through 7:d and out of the cursed area.
- Go to the square east of 5:g and walk west to 5:f. (Picture 2)
- Turn left and walk south to 7:f. A Cyan door stops here.
- Turn left and walk east to 7:g.
- Turn left twice and walk east to 7:b. A Cyan door makes you perform the second turn here.
- Turn left, activate the Green Lever, turn left again, and walk east to 7:f. A Green door stops you here.
- Turn left and walk north to 4:f.
- Turn left and walk west to 4:d.
- Deactivate the Cyan Lever, turn left, walk south through 7:d and out of the cursed area.
- Go to the square south of 7:g and walk north to 1:g. (Picture 3)
- Turn left and walk west to 1:a. A Green door stops you here.
- Turn left and walk south to 3:a.
- Turn left and walk east to 3:e.
- Turn left, activate the Yellow Lever, turn left again, and walk west to 3:c. A Yellow door stops you here.
- Turn left and walk south to 5:c. A Yellow door stops you here.
- Turn left and walk east to 5:e.
- Activate the Blue Lever, turn left and walk north to 3:e.
- Deactivate the Yellow Lever, turn left and walk west to 3:b. A Blue door stops you here.
- Turn left and walk south to 7:b.
- Deactivate the green lever, turn left and walk east to 7:g.
- Turn left and walk north to 1:g.
- Turn left and walk west to 1:d. A Blue door stops you here.
- Turn left and walk south to 2:d.
- Turn left twice, walk north through 1:d and out of the cursed area. AND INTO THE GOAL!
"No Turning" Boss Fight
Lastly, the simplest and probably the worst idea: Imagine a boss fight with a Medusa where you don't have control over your turning. The boss fight takes place in a pretty large room, and from time to time, the Medusa teleports to the opposite side of the room, and makes the player face away from her. Actually that just sounds really annoying, but maybe it could be turned into something decent?
I really hope that what I ask for actually is possible, otherwise I spent a few hours on writing and drawing all of this for nothing
I guess I could have started by asking in the simple-questions-simple-answers thread before I spent all that time... Oh well
Also, I would very much appreciate it if someone could point out any errors in my images or text!
Oh, and sorry for the long post