[Models] Sci-fi Scenery
Re: [Models] Sci-fi Scenery
You have to weld vertices, in Blender it's "Merge" - http://wiki.blender.org/index.php/Doc:2 ... g/Vertices
In GMT you can also try Model\Recalculate..., but the problem is in the model.
In GMT you can also try Model\Recalculate..., but the problem is in the model.
I'm the Gate I'm the Key.
Dawn of Lore
Dawn of Lore
Re: [Models] Sci-fi Scenery
PROBLEM SOLVED:
In GMT: Models/Recalculate Normals
This worked on everything except a few things I need to adjust via blender. Thanks everyone.
edit: e.g. It doesn't work too well on cylindars, and certain bevel corners, but I can manually fix those in blender.
edit: It is my impression that when GMT recalculates normals it actually is both making automatic smooth/flat adjustments as well as calculating normals.
edit: and yes, you can fix it in Wings3d too, then recalc normals in GMT again, and the algorith seems to figure out what it is you are trying to say
Last edited by BuzzJ on Wed Jan 15, 2014 1:47 am, edited 1 time in total.
Re: [Models] Sci-fi Scenery
This is right, but you have to select two (or more) vertices to do that.. and they will merge to one vertex, despite how much are selected.Leki wrote:You have to weld vertices, in Blender it's "Merge" - http://wiki.blender.org/index.php/Doc:2 ... g/Vertices
In GMT you can also try Model\Recalculate..., but the problem is in the model.
Won´t help here. Remove doubles works on the whole mesh without destroying, and merge distance can be set, too.
Dungeon Master Resource Pack worker and passionated Beer drinker
Re: [Models] Sci-fi Scenery
There is no visible progress yet to display, Ive solved the issue by going back and dealing with the bare mesh, manually cleaning up verices that I know are incorrect but the software does not acknowledge, manually triangulating faces where more appropriate, manually doing UVmaps by face by face selection.
After this is done I will deal with manually assigning edge hardness and face flatness/smoothness and do my damnest to find the best normal calculation I can.
This will be extremely time consuming. I imagine that since it took me more or less 2.5 weeks to do the original mesh modeling, it may take well over a month if not longer to get everything just right to the point where Phase 3: "where I make textures and bake normal maps that dont suck horribly" can be implemented.
In the meantime I won't have much to show. If there is interest in it, I could post an updated .dat file for review.
I cannot imagine anyone skilled enough to accomplish it would go through the absolute drudgery of what Phase 2 and Phase 3 entail when they could just as easily do so for their own models. For this reason, and because I want to pride myself on learning how to do all this to a correct standard, I won't release all my source materials at this time.
Re: [Models] Sci-fi Scenery
I my view you don´t have to struggle much on normals - if your models mesh(es) are consistent, there wouldn´t be a problem!
If something looks wrong, try recalculate and in most cases it will be fine.
It can be if your model has more mesh parts that some parts normals points to wrong direction.
In this case (Blender!) select one vertex of that part and select the whole mesh PART with CTRL+L, then flip normals.
And if you mirror objects. Then normal flipping/recalculation is eventually needed.
Another idea is - if your model is roughly in shape - use mesh -> vertices -> smooth vertex. This will change the the mesh!
Sometimes i use it while modeling.
I suggest - you modeled in Wings3D - that there is something unequal by exporting to *blender*..maybe?
Important:
- your mesh is a perfect hull! It can have holes in it or removed backside, no problem.
- try to add second edge loops .. see spoiler-pictures (first is abit big, try view pic..).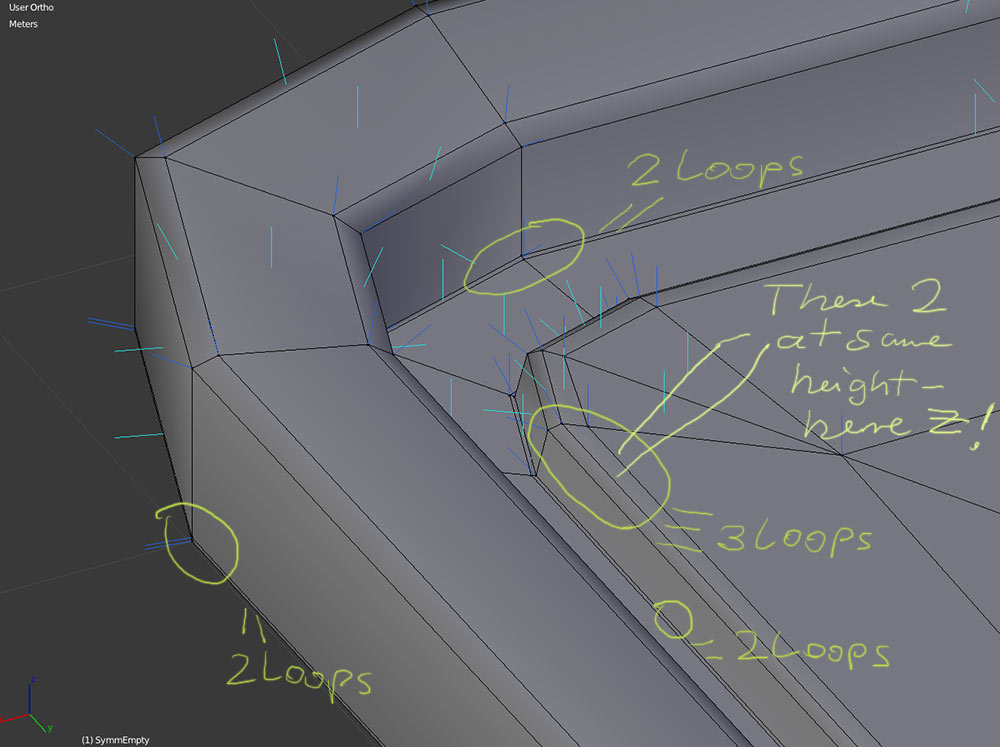
 This mesh is done wit symmetrical empty(addon) wich adds an empty with mirror modif. applied. I set 5 vertices for one quarter and set mirror to x+y. Extruded with E+Z, E+S..etc. But you can use a plane as base, too.
If something looks wrong, try recalculate and in most cases it will be fine.
It can be if your model has more mesh parts that some parts normals points to wrong direction.
In this case (Blender!) select one vertex of that part and select the whole mesh PART with CTRL+L, then flip normals.
And if you mirror objects. Then normal flipping/recalculation is eventually needed.
Another idea is - if your model is roughly in shape - use mesh -> vertices -> smooth vertex. This will change the the mesh!
Sometimes i use it while modeling.
I suggest - you modeled in Wings3D - that there is something unequal by exporting to *blender*..maybe?
Important:
- your mesh is a perfect hull! It can have holes in it or removed backside, no problem.
- try to add second edge loops .. see spoiler-pictures (first is abit big, try view pic..).
SpoilerShow


Last edited by germanny on Sat Jan 18, 2014 2:00 am, edited 1 time in total.
Dungeon Master Resource Pack worker and passionated Beer drinker
Re: [Models] Sci-fi Scenery
And, if you want to add details as screwheads or other - don´t connect to the base mesh, just join.
Ho to do a screwhead at base mesh, here inbus screw:
As this screw is created inside the base mesh, [Shift-Sel. New+Old] + [CTRL+J (Join)] is not necessary.
*edit* - again^^
If possible, do all mesh building at base position, when finished, apply rot.+scale, recalculate normals, set seams for Unwrapping.
THEN do UV unwrap and scale/position the UV-elements.
AFTER all basic creating work -! SAVE !- position your model as it should appear, and apply location, save as a copy.
Ho to do a screwhead at base mesh, here inbus screw:
SpoilerShow
Select this vertex, do mesh -> snap -> cursor to selected
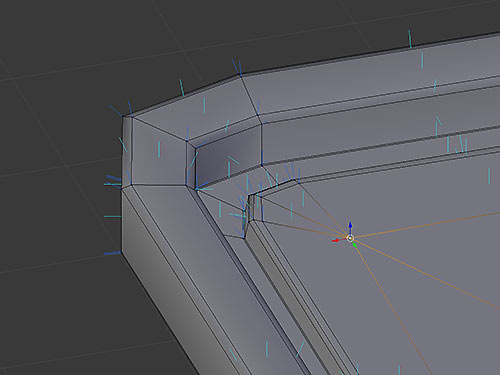
Add -> Circle, set to 8 vertices, scale wit S.
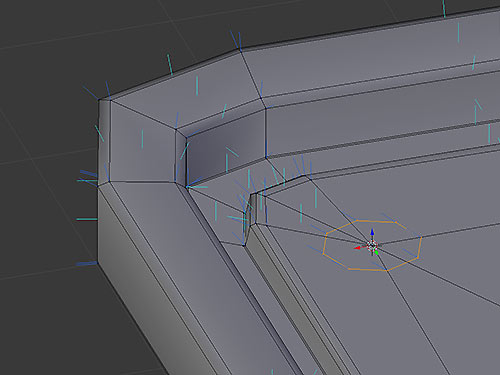
Extrude the circle E+Z(extrude to Z), E+S (extrude and scale), use manipulator to move = G+Z,
at last extrude, the innermost, use ALT+M (Merge) - choose center.
when ready, select one vert. and CTRL+L (select only connected)
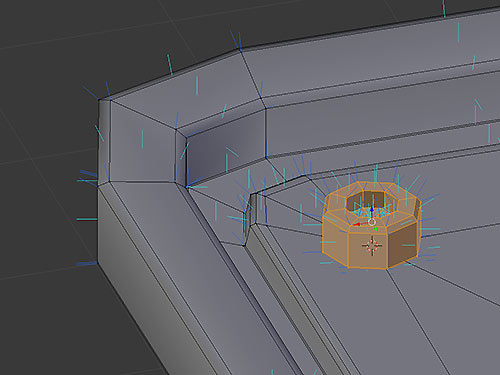
Then position it and voila^^ here only the base mesh is smoothed, the screwhead not.
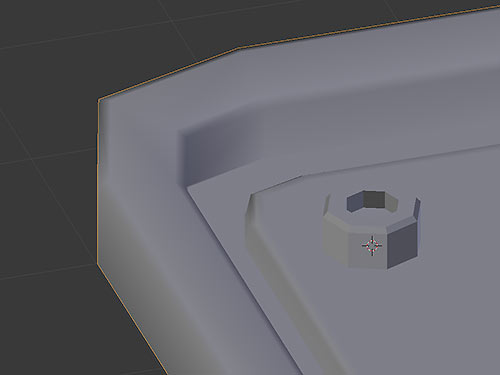

Add -> Circle, set to 8 vertices, scale wit S.

Extrude the circle E+Z(extrude to Z), E+S (extrude and scale), use manipulator to move = G+Z,
at last extrude, the innermost, use ALT+M (Merge) - choose center.
when ready, select one vert. and CTRL+L (select only connected)

Then position it and voila^^ here only the base mesh is smoothed, the screwhead not.

*edit* - again^^
If possible, do all mesh building at base position, when finished, apply rot.+scale, recalculate normals, set seams for Unwrapping.
THEN do UV unwrap and scale/position the UV-elements.
AFTER all basic creating work -! SAVE !- position your model as it should appear, and apply location, save as a copy.
Dungeon Master Resource Pack worker and passionated Beer drinker
Re: [Models] Sci-fi Scenery
All issues with normals have been resolved, as I've found a way to force GMT calculate the way I want it to in most cases.
Work continues apace on UVmaps, but it is slow.
Quick question: How do I split texture nodes on the same object so I can apply seperate UVmaps to them?
This is useful for comparable objects that have differing ammounts of surface area (say a blank floor vs a blank floor with widgets on it) that I want to have consistent resolution texture, or in some cases the same texture. I can't do that all on one UVmap.
Re: [Models] Sci-fi Scenery
Nevermind! I got it sorted. To add node segments, just have a seperate object(group) within the same .obj file. Make sure to uncheck "one object group per material", if applicable in your program of choice, when exporting. This fixes most issues related to not enough UVmap space.
On a sidenote, I absolutely HATE doing textures. Now that normals work I don't want to do textures at all anymore. But I guess I have to. Which is a shame because I really want to work on new model meshes instead. I was going to build a hangar and catwalks next, but at the same time I don't want to leave the shuttle unfinished. argh.
On a sidenote, I absolutely HATE doing textures. Now that normals work I don't want to do textures at all anymore. But I guess I have to. Which is a shame because I really want to work on new model meshes instead. I was going to build a hangar and catwalks next, but at the same time I don't want to leave the shuttle unfinished. argh.
Re: [Models] Sci-fi Scenery
Quick Question: How should I organize the models that later need to be animated?
detail: I have a door, and a doorframe as seperate models, I have alcoves, and doors for those alcoves as the same model, and computer console and its buttons as the same model.
Should I make every seperate movable part a completely seperate model? If I should keep them together, how to I assaign them new nodes in GMT?
Re: [Models] Sci-fi Scenery
Essential is a generated normal map from geometry + optional! bumpmap for texture detail.BuzzJ wrote: I absolutely HATE doing textures.
Diffuse(color) map can be baked in blender. Generate UV.
Just apply a new material to mesh(uv´d), set your color.
Optional apply procedural texture(s) with color enabled to this material - try clouds at first.
Go from 'default' screen to 'UV Editing' sreen. Generate a blank new texture without alpha here while whole uv map is selected.
Back to 'default' , go to render tab, scroll down - you see a 'bake' field. Choose full render or texture, then BAKE!
Back to 'UV Editing', you may see the baked texture image, save it - basic colormap ready.
If you examine the bake option, see what can be baked and play around^^
Dungeon Master Resource Pack worker and passionated Beer drinker
