Thousands of years ago, there existed
a civilization known as the Drinn.
Their knowledge of science, magic, and
engineering was unrivaled. They lived
in peace and harmony, caring not for
the squabbles of other societies.
They isolated themselves from war,
never demanding anything from other
nations, never giving cause for
aggression - and intimidating would-be
conquerors with their advanced technology.
Or so most of us thought.
Main site with download, screenshots, source files, and monster guide
Nexus page (does not include monster guide)
Features:
- 4 levels of puzzles and action
- Thoroughly tested
- No secret buttons, food system, or torches
- There are 15 secrets, but they are all found by solving optional puzzles, not by searching walls for buttons.
- Unlimited illumination from the Everlight Lantern in both torch and spell flavours, or use the Wand of Light if you prefer
- 16 new spells, cast by using wands instead of runes; wands don't run out of charges
- Instantly teleport between healing crystals
- Defeating monsters gives all party members full experience (no more micromanaging damage)
- Lots of new-ish items, monsters, and decorations
- Protection is much more powerful
- A special bonus for Toorum players
- A well-hidden Easter egg
- Soothing, relentlessly blue colour scheme
- Lots of other stuff I didn't mention
The rest of this post is the hint/solution guide. If you're stuck on a puzzle, consult it. If you aren't stuck on a puzzle, but want to read the rest of the thread, scroll past it really fast, or use this
anchor to the first reply.
Lost Halls of the Drinn Hints and Solutions
Level 2
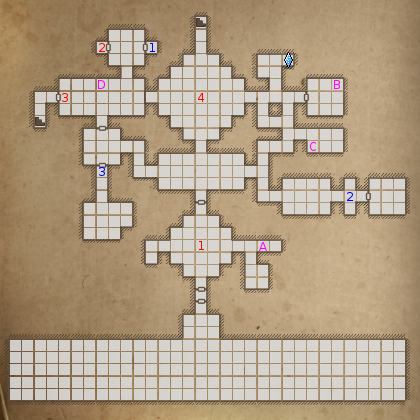
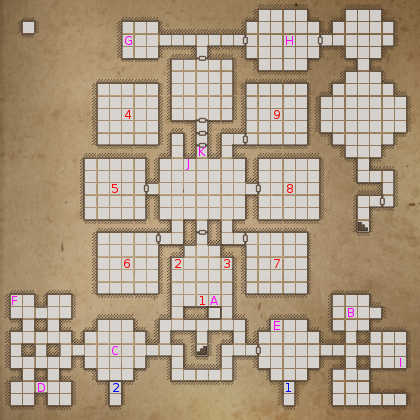
Map
Main puzzles
1. The Beginning
Hints:
Pick up the blue orb at 'A' and place it on the pedestal at '1'.
Reward:
50 XP, the lighting system turns on and a portcullis opens, allowing you to enter the next room.
. The Book
Hints:
Have you found anything that touches what men refuse to and is made out of something that's dead?
The answer is a pair of leather gloves.
Pick up the leather gloves at 'C' and place them on the pedestal near '2'.
Reward:
50 XP, guide to the Drinn language.
. The Lock
Requirements:
If you can't read the inscription next to the door here, you need to solve puzzle '2'.
Hints:
The lock is close to the inscription on the wall.
Pick up the hooked key at 'B' and place it on the altar near '3'.
Reward:
50 XP, access to level 3.
. The Obelisk
Requirements:
This puzzle is only accessible after visiting level 3.
Hints:
Attacking the "circles" will switch them between fire, cold, electricity, and nothing.
Pulling the lever will cause the four circles to shoot a beam of said element (or nothing) at the obelisk.
Carefully read the four inscriptions on the walls. Note that they follow a chronological order, and indicate directions.
Set the southern circle to fire, and the rest to nothing, then pull the lever. The obelisk will become wreathed in flames.
Next, set the eastern circle to electricity, and the rest to nothing, then pull the lever. The obelisk will become covered with sparks.
Finally, set all the circles to cold, and pull the lever. The obelisk will be frozen.
Note that using an incorrect combination of beams will return the obelisk to its original state (unless it has already been frozen).
After freezing the obelisk, you may want to read one of the inscriptions again.
"And yet, the assault of the elements may have exposed its weakness."
Attack the frozen obelisk directly with your weapons (or fists, or spells). It will eventually shatter.
After destroying the obelisk, return to the Shrine of the Obelisk on the previous level (marked with 'D' on its map), and a key will fall onto the pedestal.
Reward:
Secrets
1. The Riddle
Requirements:
The note with the riddle is found after solving puzzle 3.
Hints:
What have you found that was once alive and is covered in black blood?
Perhaps it's not literal blood, just a black liquid?
The answer is any of the notes you've found, as they are paper covered in black ink.
What would a piece of paper's "graveyard" be?
A book. Place a note on the shelf at '2' where you found the guide to the Drinn language.
Reward:
100 XP, the Wand of Rockstrike.
. The Three Plates
Hints:
There are three pressure plates here. Have you found anything that might tell you what to do with them?
A note on the floor near 'C' has a diagram showing what to do.
Note the direction of the arrow on the note.
The note indicates that the plates are to be pressed in a specific order.
Flip the note around 180 degrees so the arrow is pointing up (you can't do this ingame; turn your head sideways or just do it mentally). Go through the plates in sequence in the direction of the arrow.
Facing the door, the sequence is right, left, right, right, left, right, center.
Reward:
200 XP, leather shirt, health crystal, hand axe, dagger.
. The Unreachable Room
Requirements:
This secret is only accessible after visiting level 3.
Hints:
You probably noticed that the lever at 'D' closes the nearest portcullis, but opens another portcullis further away.
Pull the lever down so that the nearest portcullis is closed, then walk to the other portcullis through the obelisk room (if you've unlocked it) or by going down to level 3 and using the Gem of Crystal Harmony to teleport to this level's healing crystal. You can then walk through the opened portcullis.
Reward:
The Wand of Firebeam, steel-toed boots, skull, giant crab.
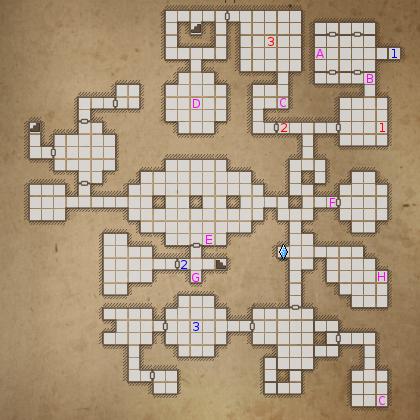
Map
Main puzzles
1. The Figurines
Hints:
The numbers written on the wall correspond to the figurines.
Each number indicates which figurine should be placed on each tray.
There is one figurine that such a number cannot be assigned to. It is indicated by the question mark.
That figurine is the sphere.
The numbers indicate the number of edges in the shape represented by the figurine.
The triangle has 3 edges, the square has 4, the pyramid has 8, the octahedron and cube have 12, the dodecahedron and icosahedron have 30, and the sphere has ?.
Reward:
200 XP, a runestone key, the Wand of Flamedance.
. The "The Obelisk" Alcove
Hints:
Place the Obelisk Miniature found at 'C' in the alcove.
Reward:
50 XP, the metal ball, access to puzzle 3.
. The Sixteen Lights
Requirements:
You must solve puzzle 2 to access this one.
Hints:
You need to switch all sixteen lights on.
Try to figure out how the pressure plates affect the lights.
Every plate has a similar effect; they only differ by location.
Each plate toggles the four lights around it; lights that are off turn on, and lights that are on turn off. Stepping off the grid entirely will turn off all the lights.
Thus, to turn on all 16 lights at once, you need to step on the four corner plates an odd number of times, and the rest of the plates an even number of times.
An easy way to do this is to walk on one of the corner plates, then walk on the other 7 edge plates once. Then step onto the center plate, and step on each of the adjacent plates (and back) once.
Reward:
50 XP, access to the full-size Obelisk on level 2 and the Shrine of the Obelisk on this level.
To unlock the door at '
E':
You need a runestone key. Either solve puzzle 1 on this level, or solve puzzles 2 and 3 on this level plus puzzle 4 on level 2.
To unlock the door to the Armoury at '
F':
Use the Sword Key found at 'G'.
. The Chamber Behind the Teleporter
Requirements:
You must solve puzzle 1 to access this secret.
Hints:
When you pull the lever at 'B' to escape the chamber after taking the runestone key and fighting the herd--I mean, Greencaps and Frostcaps, you may notice that it also opens a chamber behind the teleporter in the room.
What did you do to activate the teleporter?
To deactivate the teleporter and allow access to the chamber through the newly opened passage, simply "unsolve" puzzle 1 by removing one of the figurines from its tray.
Reward:
Health crystal, stiletto, the Wand of Shocksphere.
. The Serpent
Requirements:
You must open the door at 'E' to access this secret.
Hints:
After stepping on the pressure plate at '2', something changes about the large room in the center of the level; try walking through it again.
As you walk through the room, you will leave behind a blue trail that evaporates if you leave the room or step over the same square twice.
Have you found any clues that might relate to this?
The note under the table at 'H' has the solution to this puzzle.
The note depicts the large room; the circles represent the lights.
Follow the path of the serpent through the room from one end to the other. You can do it backwards or forwards.
Stand in the corridor west of the room and move east until you hit the first pillar. Then move north, east, east, south, east, south, east, east, north, east, north, east, east, south, east, east.
Reward:
200 XP, plate helmet, skull, the Whirlwind Blade.
. The Electricity Sphere
Hints:
Notice that the door in this room opens while electricity is arcing into the receptor, and closes when it is not (usually when it is arcing to you instead).
Electricity follows the path of least resistance; if you are closer to the sphere than the receptor, then it will arc to you.
Do you have a way to shorten the arc to the receptor?
Perhaps by splitting it into two smaller arcs?
Take the metal ball at 'C' and place it between the receptor and the sphere. The electricity will arc to the ball and then the receptor. These arcs are shorter than arcing to you from 2 squares away, so you can get through the portcullis.
Reward:
200 XP, the Wand of Thundercall, the Amulet of Air, sandals, two pairs of leather boots, leather gloves, leather cap.
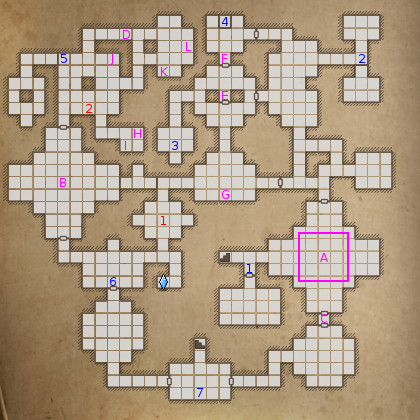
Map
Main puzzles
1. The Jumping Key
Hints:
Unless you are superhumanly fast, you won't be able to catch the key by running after it.
There is a clue for this puzzle nearby.
Pull the lever in room 'B' to open up a small passage containing an inscription, saying something about a jumper and fire. Note that this lever also releases the Willowhispers and Frostcaps in the room to the north, so be ready for that.
Do you have anything that produces fire?
Place items that produce fire (or appear to produce fire) on a pedestal and the key will refuse to jump into it. Usable items: all Fire Magic wands, the Amulet of Fire, the Everlight Lantern in torch mode.
While you can obtain the key by blocking two of the pedestals with fire items, you actually only need one: stand adjacent to two pedestals (which will make the key jump to the one you aren't adjacent to), then throw one of said items onto that pedestal. The key will have no choice but to leap off of it and into your hands.
Alternate solution:
Toorum is fast enough to catch the key with ease, either by beating the key to its destination pedestal, or by running across the key's path and catching it with his face.
Reward:
Fun Fact:
In the original version of this puzzle, you found a bowl of mud elsewhere on the level and had to put it on one of the pedestals so that the key would jump into it and get stuck in the mud. I decided that was stupid, so I went with the fire thing instead.
. The Sky Restored
Hints:
This isn't really a big puzzle. Just find the three sun disks and the moon disk and put them on the four pedestals.
The disks are at 'D', 'J', 'K', and 'H'.
Reward:
The door opens allowing you to escape to the rest of the level.
To unlock the doors at '
C':
You need both of the gem keys. One can be acquired by solving puzzle 1, and the other is located in an alcove at '2'.
. The Second Runestone Lock
Hints:
If you got both runestone keys from the puzzles on levels 2 and 3, use the second one here to unlock this secret.
Reward:
The Wand of Gelid Barrier, Bracelet of Shielding, plate greaves, health crystal, energy crystal, restoration crystal, Admascus longsword, plus either a Tome of Defense or a Tome of Fundamental Skills (50% chance each, randomly chosen at start of game)
. The Four Weights
Hints:
Where have you seen a pair of eyes?
The dragon statue near 'G'.
'G', directly behind the dragon, is a spot that is near but unseen to its eyes.
Where would the skies be?
Up. Use the free look feature to look up at the ceiling; you will see a picture drawn on it.
This picture depicts the room with the inscription, the weights, and the eight alcoves.
The runic characters represent the inscription, and the lines represent the alcoves.
The circles represent the weights that should be placed in the alcoves. Larger circles represent heavier weights.
The inscription outside the weight room reads "The Four Weights", and the picture contains four circles, but you only found three weights in the room.
There is no fourth weight.
What is the purpose of a weight?
Normally, all a weight does is weigh a specific amount.
You can replace the missing weight with any combination of items that adds up to 3 kilograms (the three weights you found were 1, 2, and 4 kilograms).
Place 1 kilogram in the alcove directly to the left of the inscription in the weight room, and 3 kilograms in the alcove directly left of that one. Place 4 kilograms in the western alcove on the south wall (directly across from the 1 kilogram alcove), and 2 kilograms in the southern alcove on the east wall. Obviously, it's easiest to just use the actual weights for the 1, 2, and 4 kilogram alcoves, but it's not required.
Reward:
200 XP, the Wand of Flashfire, the Amulet of Fire, Thunderlash
. The Altar of Thunder
Hints:
"Thunder must strike here twice." You need to find a way to get thunder to strike, twice.
In rooms 'A' and 'B' are inscriptions stating that "Thunder will strike..."; follow their instructions.
After thunder has struck twice, return to this room to reveal the secret.
Hints for room '
A':
The inscription in room 'B' refers to this room.
"Thunder shall strike for the one who draws a box about the twelve pillars with their feet." This room has twelve pillars in it.
Walk around the pillars, drawing a rectangle.
Walk over the squares in the magenta rectangle shown on the map. If you step off the rectangle, or step on the same square more than one, you'll have to start over. It doesn't matter where on the rectangle you start, you just need to step on every square once. You'll know when you've done it correctly, as you'll hear distant thunder and receive 100 XP.
Hints for room '
B':
The inscription in room 'A' refers to this room.
"Thunder shall strike for the one who paces about the pedestal ... ensewens". There is a pedestal in this room.
You need to walk over the pressure plates around the pedestal in a specific order.
The order is in the inscription.
"ensewens" is not a word.
Walk on the plate to the east of the pedestal, then the plate to the north, then south, east, west, east, north, south. You'll know when you've done it correctly, as you'll hear distant thunder and receive 100 XP.
Reward:
200 XP, the Wand of the Thunderstruck.
Further details about the reward:
The Wand of the Thunderstruck is searching for something. Does its name sound familiar?
Where else in Grimrock have you seen the word "Thunderstruck"?
The wand is looking for someone with the Thunderstruck trait.
You can only get the Thunderstruck trait by playing as Toorum (or cheating).
Should you have a party member with the Thunderstruck trait, the wand will awaken when you touch it. The Awakened Wand of the Thunderstruck gives some useful bonuses when wielded, including fast energy regeneration, and instead of requiring Air Magic skill, it casts powerful Thunderfire and Thunderstone spells using your Fire and Earth Magic skills.
Using the Wand of the Thunderstruck will cast a random Fire Magic or Earth Magic spell that you have enough skill to cast, and is heavily weighted towards picking higher-level spells if you can cast them (with higher skill making them even more likely). It greatly augments the spells' power as well.
Flamespit becomes Thunderspit, adding sparks to the liquid flame and doubling the total attack power.
Rockstrike becomes Thunderstrike, firing a faster projectile with longer range and attack power of 16+[Earth Magic skill].
Flamedance becomes Thunderdance. Shockbursts (attack power [Fire Magic skill]*2) will randomly appear on tiles affected by Flamedance, at a rate of 1 per second on average.
Rockskin is not cast by the Wand of the Thunderstruck.
Firebeam becomes Thunderbeam, firing a bolt of lightning to go along with the beam of fire, doubling the total attack power.
Stonefury becomes Thunderfury, giving you the Haste effect in addition to the Rage effect. The Haste duration is half as long as the Rage duration.
Flashfire becomes Thunderflash, adding a burst of lightning to the burst of fire, increasing the total attack power by 60%.
Stoneshatter becomes Thundershatter, causing every Stoneshatter-affected square to be struck by lightning over the next 5 seconds.
Should a Thunderstruck champion die while wielding the Wand of the Thunderstruck, the Wand will sacrifice itself to return them to full health and energy.
. The Ice Block
Hints:
You need to melt the block of ice.
Is there something on this level that could do it?
Pulling the lever in this room makes the dragon statue shoot out a beam of fire.
But the beam is blocked by two doors. Find two levers elsewhere on the level to open the doors.
The levers are at '
C' and '
D'.
Reward:
200 XP, the Wand of Glacial Power, the Amulet of Ice.
. The Sky Restored
Hints:
While placing the four disks on the four pedestals is sufficient to leave the room, there is an additional reward for restoring the sky correctly.
The four disks need to be in a specific order.
The moon disk goes on the pedestal that doesn't have a light above it, and the sun disks on the other pedestals. You probably solved this one by accident.
Reward:
200 XP, the Amulet of Earth, the Head of Life, 3 health crystals.
. The Song of Stone
Hints:
Try clicking on the small trays in the north of this room.
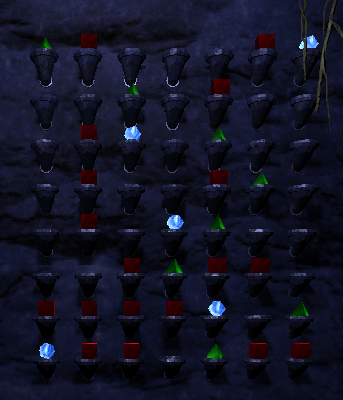
Each click switches between three shapes (and nothing), playing a corresponding note each time. Pulling the lever causes the rows to be played in sequence.
Have you found anything that might tell you the song of stone?
The song is on a note located at 'I'.
Note the number of rows and the direction of the triangles.
The note should be rotated 90 degrees counterclockwise (you can't do this ingame; turn your head sideways or just do it mentally). You can then simply click until the shapes match the note, then pull the lever to play the entire song and open the door.
A screenshot of the solution:

Reward:
200 XP, Harngha, the Wand of Stoneshatter, plate boots, 6 restoration crystals, another path to level 5.
. The Force of Death
Show the forces of the four elements on the altars. The altars will subtly light up when you're making progress.
Place at least one fire-based item, at least one air-based item, at least one ice-based item, and at least one earth-based item on the altars. It doesn't matter which altars; you can put them all on one altar, or spread them out.
The wands and amulets are valid items for their element. In addition, you can use the Everlight Lantern in torch mode for fire, Thunderlash and the Whirlwind Blade for air, and rocks or runestone keys for earth.
Reward:
100 XP, the Spike of Force.
Map
Main puzzles
1. The Red Gem
Hints:
Deal violence unto the inscription.
Attack the inscription at 'A' in melee.
After getting the red gem, place it on the pedestal at '1'.
Reward:
2. The Green Gem
Hints:
Have you seen nine of something nearby?
Click on the nine arrow figurines in room 'C' to rotate them; make them all face east to solve this puzzle.
After getting the green gem, place it on the pedestal at '2'.
Reward:
3. The Blue Gem
Hints:
Have you seen blue light shining down from the heavens anywhere?
Stand on 'B' and wait (meditate) 10 seconds. It doesn't matter whether you are resting or not, you just need to stay there for 10 seconds.
After getting the blue gem, place it on the pedestal at '3'.
Reward:
4. The Green Riddle
Hints:
The only clue for this riddle is "Chamber of Life".
After killing the green guardian, a Life Gem will fall into its chamber.
Pick up the life gem and place it on the tray at 'J'.
Reward:
200 XP, the green orb lights up.
. The Cyan Riddle
Hints:
Look to the sky to see a path.
The ceiling shafts in the cyan chamber indicate the path you must walk along. Pass under every ceiling shaft without passing under a regular ceiling tile; it doesn't matter where you start from, you just need to pass under every shaft.
Reward:
200 XP, the cyan orb lights up.
. The Blue Riddle
Hints:
What does an owl often do during the day?
Go to sleep inside the blue chamber. You'll wake up automatically after a few seconds and the puzzle will be solved.
Reward:
200 XP, the blue orb lights up.
. The Magenta Riddle
Hints:
Is there a pair of something in this chamber?
One of the alcoves must bear twice the burden of the other.
Place items in the alcoves so that one alcove contains twice the weight of the other (the weight must be nonzero). Since this mod gives out lots of 0.1kg items, it is likely easiest to put 0.2kg in one alcove and 0.1kg in the other.
Reward:
200 XP, the magenta orb lights up.
. The Red Riddle
Hints:
Death once ran through the bloody grates in the floor of the chamber.
After killing the red guardian, it scatters four Blood Gems. Pick up the four gems and place one on top of each grate.
Reward:
200 XP, the red orb lights up.
. The Yellow Riddle
Hints:
What would a ball of stone be?
Take a rock (there is one nearby at 'K') and throw it at both of the demon heads in the yellow chamber. Each demon head will shoot out a firebeam when hit, so if you don't want to get hit, dodge while you throw the rock.
Reward:
200 XP, the yellow orb lights up.
Opening the door at '
K':
Light up all six color orbs by solving puzzles 4 through 9.
Opening the door to the room at '
H':
Simply pull the lever at 'G'.
. Good
Hints:
There is a note on this level that shows how to find this secret.
The note depicts a room on this level.
Turn the note 180 degrees (you can't do this ingame; turn your head sideways or just do it mentally).
The note depicts the room containing this secret, and the arrow points to the table at 'E'.
The note depicts something that must be placed on the table at 'E'.
The note depicts itself. Place the note itself on the table at 'E'.
Reward:
200 XP, the Slayer, the Heels of Life.
. Evil
Hints:
There is an inscription on this level that shows how to find this secret.
Opposite the Soulcage at 'F' is the relevant inscription.
"The crown of bone" is a skull.
Place a skull at 'C' after solving puzzle 2 to reveal the sunlight. There is a skull conveniently located at 'I', in case you missed or dropped the two skulls on earlier levels.
Reward:
Level 6
Map
The Lever:
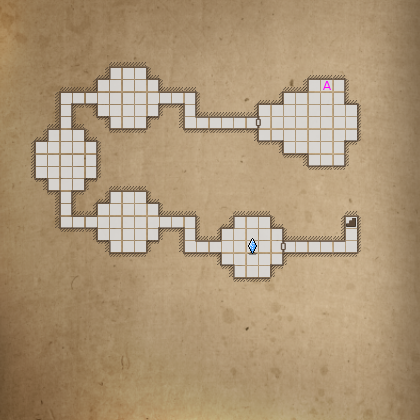
Pulling the lever at 'A' will end the game.
